 Ever need to temporarily reference another document while working on something – this may be an image, or instructions, or a PDF file. Many times you want it floating right on top of your current document so you can refer to it while you are working, and not have to switch back and forth between applications.
I do this a lot when working in Illustrator, especially working from reference images, but also the occasional email message or PDF file sent by a client.
A cool tip on it’s own is to just make a screenshot that saves automatically to the clipboard – you can do this by using the OS X keyboard command Command-Shift-4, which will bring up your screen shot “cross-hairs” cursor (you can let the keys go now), and then dragging over the area you wish to take a screen grab from. Here’s the secret tip to avoid making an automatic screenshot image file, and save to the Clipboard (where things you copy & paste are saved: hold down the Control key before letting go of the mouse button. Bingo, the image is saved to the Clipboard, and then you can open up Preview and hit Command (Apple key)-N, which if you look at the menu option under the File menu is “New from clipboard”.
Next step you’ll have to have the free software “Afloat“ installed. Afloat lets you make almost any window in any application “float” above all the other windows, and you can also set the transparency level for each window. The window will turn fully opaque when you mouse over it. And it looks like the new beta version of the software has an “Overlay” feature where you can click through the window, which sounds super cool. I am still using the regular stable version (in fact didn;t know there was a beta version out until I just checked the link for this post).
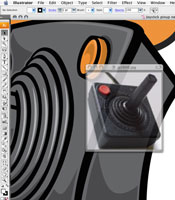
Afloat will add new items under your “Window” menu where it is able to do it’s magic. Once you select “Keep Afloat” (or use the keyboard shortcut), your window will automatically have the “Always On Top” option checked, and once you move your pointer away from the window, it will become transparent. Now, switching to another application doesn’t cover up that window, and that window only. You can control the level of transparency, and even select none to make it fully opaque.
You now have an always-on-top, transparent window with your reference image above your Illustrator or Photoshop document! And this can be combined with my previous tip regarding using the Command (Apple) key to move windows from other applications without bringing them to the front (aka giving them “focus”). And just to clarify, this tip applies to any image — not just screenshots.